How to Remove Sign in Options on Windows 10
Windows 10 is the most widely used operating system these days. It provides a very friendly user interface and is extremely easy to use. All of the operating systems possess different ways of logging into them. You can either have a simple login mechanism in which you can log in to your system automatically without providing any login credentials or you can have a credential-based Sign-in. In this article, we will talk about the different Sign-in options that are available in Windows 10. We will explore how these options provide security to your systems. We will discuss the implications of removing these options and we will learn how to remove the PIN and other Sign-in options on Windows 10.
What are the Different Sign-in Options in Windows 10?
If we talk about Windows 10, then following are the six different Sign-in options that it provides:
- Windows Hello Face
- Windows Hello Fingerprint
- Windows Hello PIN
- PIN
- Password
- Picture Password
The first three options are valid only for those Windows 10 devices that have Windows Hello service available. However, the last three options are generic and are available in every Windows 10 device.
How do they Play an Important Role in Securing your System?
Whenever you have an account online or on a hardware device, you always prefer to keep it protected i.e. you do not want to allow everyone to have access to it. To ensure this, you take certain security measures such as password protecting your accounts. What these measures essentially do is that they prevent any third person or intruder from breaking into your system since your password or any other credentials that you have used to protect your system are kept secret and are only known by their owner. That is why all the illegal accesses to your system are denied as long as you manage to keep your particular Sign-in credential secret.
Should you Ever Consider Removing these Options?
There are very rare situations in which you would feel the need for removing any of the Sign-in options you have because they are responsible for securing your systems. Removing these options means that your systems will be vulnerable to all the external attacks and threats and any illegitimate user will be able to break into your systems. That is why it is highly not recommended to do so. However, if for any reason, you still feel like removing these options may be for easier accessibility, then do it at your own risk because then Windows 10 will not going to guarantee you any protection against illegal accesses.
How to Remove your PIN and other Sign-in Options on Windows 10?
In order to remove your PIN on Windows 10, you will need to perform the following steps:
- Type Settings in the search section of your taskbar and double click on the search results in order to launch the Settings window.
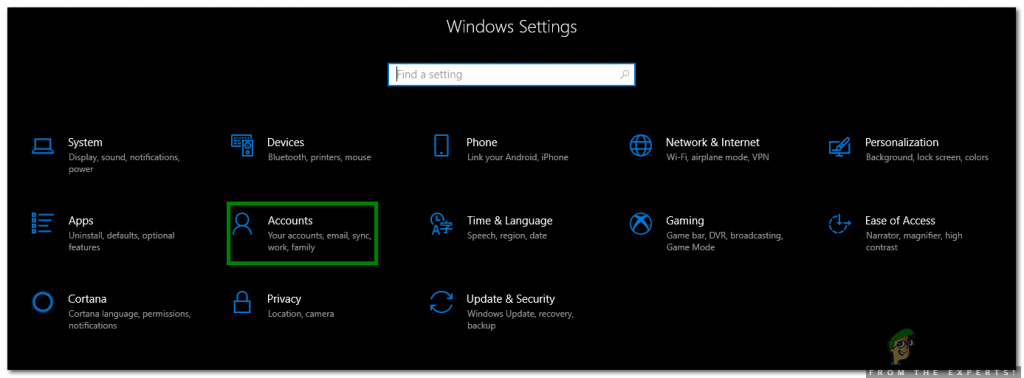
- In the Settings window, double click on the Accounts tab as highlighted in the image shown below:

Click on the Accounts tab from the Settings Window - Now select the Sign-in Options tab from the left pane of the Accounts window.

Select the Sign-in Tab from the Accounts Window - Locate the PIN section in the Sign-in Options window and then click on the Remove button as highlighted in the following image:

Click on the Remove Button located below the PIN Section - As soon as you will click on this button, Windows 10 will prompt you with a confirmation message. Click on the Remove button again in order to provide confirmation.

Provide Confirmation of your Decision by Clicking on the Remove Button Again - Windows 10 will now ask you for your current Sign-in Password. Just enter your password and click on the OK button in order to save your settings.

Enter your Windows 10 Password and Click on the OK button in order to Remove your PIN on Windows 10
In the same manner, you can remove all other Sign-in options like the PIN. However, the point to be noted here is that you will only be able to set up and remove these Sign-in options if you have a login password. For removing the login password in Windows 10, you will have to follow the steps mentioned below:
- Type netplwiz in the search section of your taskbar and click on the search results in order to launch the User Accounts window.
- In the User Accounts window, uncheck the checkbox corresponding to the field saying, "Users must enter a user name and password to use this computer" as highlighted in the image shown below:

Uncheck the Highlighted Checkbox - Now click on the Apply button.

Click on the Apply Button - As soon as you will click on it, Windows 10 will ask you for your current password. Just enter your password and then click on the OK button in order to save your settings as highlighted in the following image:

Finally, Enter your Current Password and Click on the OK button in order to Remove your Login Password in Windows 10
As soon as you will save these changes, Windows 10 will no longer ask you for your password at the time of login. However, we will recommend you again not to remove these Sign-in options unless you are very sure that no one else except for you will even try to access your computer system. Otherwise, your critical data will be at stake.
![]()
Ayesha is a software developer by profession and is currently working as a lead developer with Code5.Programming Skills: Asp.net, C#, C/C++, Java, Golang, Android, UML, SQL and Html.
How to Remove Sign in Options on Windows 10
Source: https://appuals.com/windows-10-sign-in-options/
0 Response to "How to Remove Sign in Options on Windows 10"
Post a Comment